
Welcome to your Simple Mini Journal Making eCourse.
The video below teaches you how to deconstruct a composition book and make it in to a nice journal to then creatively decorate to suit your own taste.
I personally like to make several at one time.
It is FUN!
Then when I am ready for a new one I have the base already done...
OR I can make and joyfully gift one to another.
MATERIALS NEEDED:
Composition Book (Dollar store, Target, Walmart etc)
Razor Blade or Exacto Knife (Hardware Store)
Decoupage Medium (like Mod Podge) - I Prefer Matte
(White Glue Slightly Watered down also works fine. Will dry matte.)
Paper Hole Puncher
Binder Rings (office store or office supply section)
Paper for the Covers (Craft Store)
Use either white cardstock and then paint over it to give it a finished look
OR
use pretty scrap book paper that makes you happy to see.
OPTIONAL GOODIES:
Tab makers like small post it notes
Misc papers cut to size for inside journal
(I like lots of good heavy weight white paper for my doodling and random creativity)
Manila Folders cut down make wonder section seperators
Envelopes are fun to keep little found objects or what-nots in
(I like lots of good heavy weight white paper for my doodling and random creativity)
Manila Folders cut down make wonder section seperators
Envelopes are fun to keep little found objects or what-nots in
Paints to pretty it up
Water based varnish to seal your cover artwork and give it a nice sheen.
Yarn, Strings, Ripped Fabric pieces to dangle from your Binder Rings
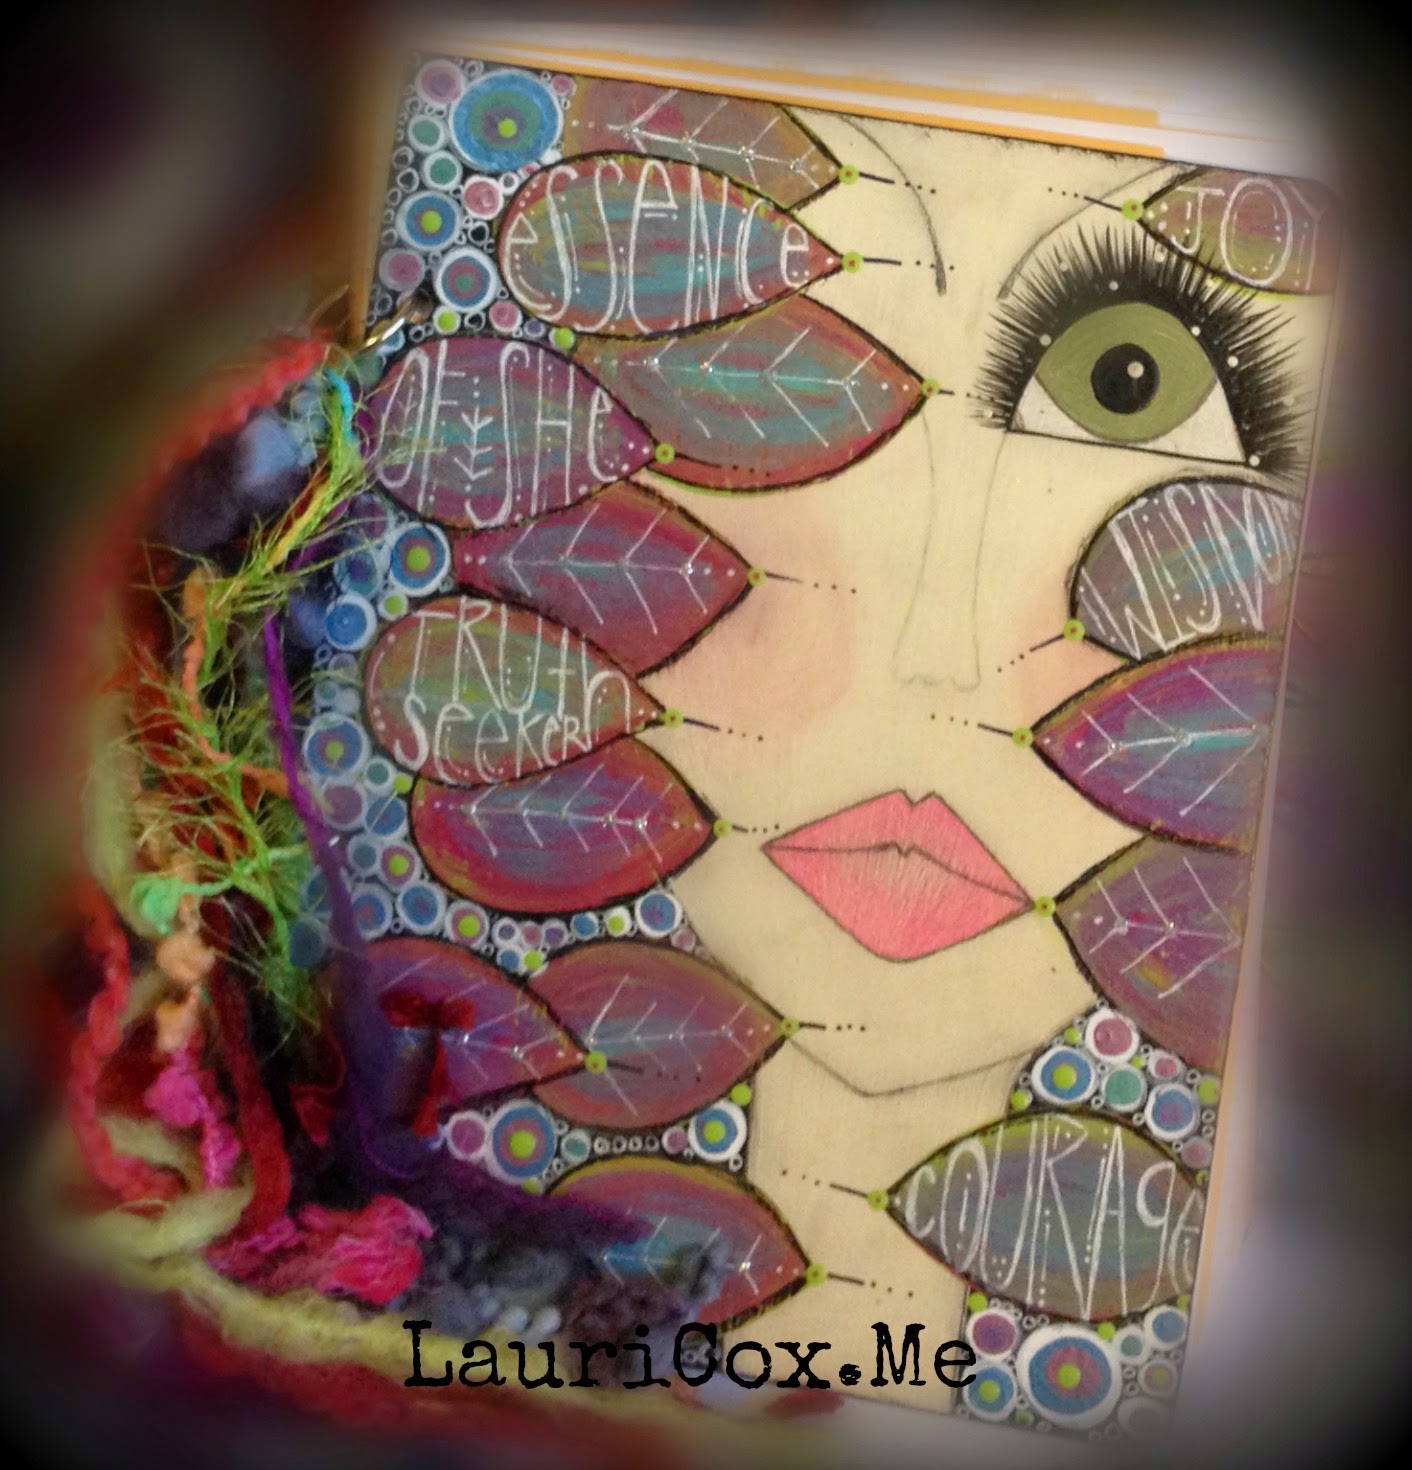 |
| Example of painted journal cover I made using this EASY journal making process. |
This is your Keeper or Sacred Dreams, Thoughts and Soul Work.
So my 1st thought it to have fun with this.
Connect to it, the fun of the creating it.
Be as creative or as simple as you like.
I personally like mine pretty.
I personally like mine pretty.
Turn on some fun music and make a few while you are at it.
::JOURNAL COVER::
*Cut out paper from spine
*Cut journal cover in half
Now it is time to decoupage on the paper.
Use either plain white or pretty scrap book paper.
*Decoupage paper on 1 side of cover 1, set aside to dry thoroughly
*Decoupage paper on 1 side of cover 2, set aside to dry thoroughly
:::HINT:::
Air bubbles will occur in the drying process.
To eliminate as many as possible I like to use an old credit card to gently push out as many bubbles and excess glue as possible.
Remember that bubbles and imperfections are part of the organic beauty of your creative projects.
Once the 1st sides are thoroughly dry
*Trim paper around journal for a nice finished edge
*Decoupage paper on 2nd side of cover 1, set aside to dry thoroughly
*Decoupage paper on 2nd side of cover 2, set aside to dry thoroughly
:::REMEMBER:::
The Covers may curve and bend.
NO WORRIES!!!
This is natural. You can reshape them to be flat.
*Trim paper around journal for a nice finished edge
IF you used pretty scrapbook paper for your cover be sure to create a protected finish and decoupage over the paper. I prefer using matte decoupage:
*Decoupage over paper on 1 side of cover 1, set aside to dry thoroughly
*Decoupage over paper on 1 side of cover 2, set aside to dry thoroughly
Be sure to decoupage the outside edges.
This gives extra security and support to ensure your paper does not lift.
*Decoupage over paper on 2nd side of cover 1, set aside to dry thoroughly
*Decoupage over paper on 2nd side of cover 2, set aside to dry thoroughly
IF you used white paper for your cover be sure to create a protected finish and paint over the paper. :
*Paint paper on 1 side of cover 1, set aside to dry thoroughly
*Paint paper on 1 side of cover 2, set aside to dry thoroughly
I like to use black paint but use whatever color you like.
Be sure to paint the outside edges.
This gives extra security and support to ensure your paper does not lift.
*Paint paper on 2nd side of cover 1, set aside to dry thoroughly
*Paint paper on 2nd side of cover 2, set aside to dry thoroughly
Decorate your cover how ever you feel inspired to do.
If you do any kind of artwork on your cover I HIGHLY recommend that add a layer or two or three of decoupage AND even a coat or two of water based varnish to keep it pristine and protected.
If you do any kind of artwork on your cover I HIGHLY recommend that add a layer or two or three of decoupage AND even a coat or two of water based varnish to keep it pristine and protected.
::JOURNAL PAPER::
Cut paper in half from composition book
No need to worry if they are all the exact perfect size.
They will fit fine inside your journal cover.
Trim random papers to size.
White Printer paper (I prefer 32 lb printer paper)
Cardstock
Scrap Book papers
Manila Folders
Manila envelopes
Watercolor paper
etc.
Create sections, for example::
Tribe Notes and Soul School Assignments
Gratitudes
Random Thoughts
Rip Out Fire Burning Thoughts
(we will talk about this in the Tribe)
Other Random Classes
Creative Time, doodling and such
Find a calender you can print and add.
:::PUT IT TOGETHER::
Line up small stacks
Punch holes
Add Binder Rings
Add ribbons, yarns, fabrics as inspired.
p.s.
If you are interested in any of my Creative Courses to do to use for your Journal Cover you can access them on my eCourse page.

Hope you had a good time.
Hope to see it posted in the Tribe FB Group!
Hope to see it posted in the Tribe FB Group!
Love Lauri
p.s.
If you are interested in any of my Creative Courses to do to use for your Journal Cover you can access them on my eCourse page.